


X-Post from my other personal site, Free-Range.org
Though this site mostly chronicles my adventures in the natural domain, astute readers may have guessed what a tech dork I actually am. If you haven’t, you’ll be certain after this post.
In my work life, I’m online all the time and I’ve seen software developers make great strides recently toward automating formerly mundane tasks. For example, when someone fills out a form online, I used to be emailed the output and that’s all. Now I can have it auto-imported into a contact management database and sent to a spreadsheet at the same time, so I can sort it, update it and refer to it super easily. Previously, this would have required me to do data entry in a variety of different places — and each time there was the potential for me to make an error.
Of course, I’m eager to apply these time-saving shortcuts in my non-work life, as well. Hence, the project I’ll outline here.
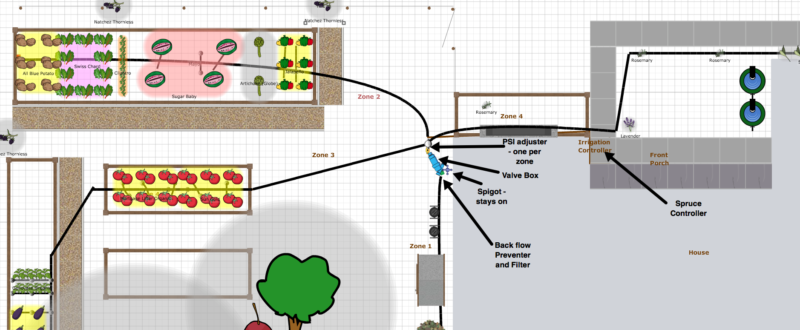
The central piece of equipment I’m using here is called a Spruce Controller — it’s one of many new-to-the-market smart sprinkler-system controllers like Rachio, RainMachine, Blossom, Parrot Flower Power and others. The basic idea behind them is that traditional sprinkler controllers are dumb — they keep watering on the set schedule even if there’s been a huge downpour. The “smart” controllers, on the other hand, take data from a variety of sources — they check the internet for recent weather events and for forecasts and they incorporate data from soil moisture sensors. Mine coordinates with (and requires) my Samsung SmartThings hub, which controls all my “smart” home automation gadgets.
Additionally, they can be programmed to adjust to the particular area they’re watering. Is it a vegetable garden? A lawn? A xeriscape? And what about the terrain? Is it a slope? Is the soil sandy or loamy? Each answer has implications for how watering should take place. For example, on a slope, the system does its watering in three “rounds,” giving each round a chance to soak in before it starts the next. That way all your precious water doesn’t just drip down the hill.
Many of these automatic sprinkler controllers are made to replace the old-skool controllers that many already have installed in their houses. In that case, it’s just a matter of switching out some wires and you’re in business. My house, however, didn’t come with a sprinkler system installed. And I probably wouldn’t want one, anyway, given that they’re usually set up around lawns, and I’m not crazy about lawns. So, I had to start from scratch, which means I got to design it just the way I want. That situation also brought some challenges, because most of such systems aren’t set up around hose-end watering — meaning that you don’t have a dedicated water line, but instead are depending on an existing spigot.
The first thing to know is that I needed to buy some valves — this is what the controller controls, opening and closing valves to turn the water on and off as needed. Most valves are designed to be put underground along with that dedicated water line. And, in most cases, you have to buy them one by one. However, I found an item designed for drip irrigation that included 4 valves in one and could also handle a hose-end source. It’s called the eZvalve4 by Antelco, an Australian company, and I was only able to find it online at Sprinkler Warehouse. (One person I consulted with raised questions about backflow prevention with this particular item — so don’t take anything I say here as gospel. I can only tell you what I have done and experienced.)

So, from the spigot, here’s what I have in place, in order:
- Spigot – turned on. I have multiple outlets here so that I can water manually if needed.
- Backflow preventer and filter – keeps the lines clear of debris and prevents the water from flowing back into our water system
- Short-length hose – must be able to handle the pressure of being filled all the time
- eZvalve box, outlet 1
- PSI regulator (25 psi)
- Hose to 1/2 inch distribution line adapter
- eZvalve box, outlet 2
- PSI regulator (25 psi)
- Hose to 1/2 inch distribution line adapter
- eZvalve box, outlet 2
- PSI regulator (25 psi)
- Hose to 1/2 inch distribution line adapter
- eZvalve box, outlet 4
- PSI regulator (25 psi)
- Hose to 1/2 inch distribution line adapter
Then, from the 1/2 inch distribution line, I have connected 1/4 inch distribution line by each plant I want to water. At the end of that, or somewhere in-line, I put an emitter. It’s low-flow and theoretically is pressure-adjusting, which means that the plants at the end of the distribution line will receive the same amount of water as the ones at the beginning. This is not true with soaker hose, which is something that I’ve tried to use before, relatively unsuccessfully.
To control for plants that need differing amounts of water, I chose emitters of three speeds: 1/2 gallon-per-hour, 1 gallon-per-hour, and 2 gallons-per-hour. Honestly, I don’t know what I’m doing there and I’m just going on instinct, so I won’t go into additional detail.
What about those fancy rain barrels, you might ask? Well, I do have hopes of eventually hooking a pump to the rain barrels, so that the water flow will be pressured enough to go through the valves and water the plants. But I’m not there yet, so I’m relying on regular hose water for now.
click to open the image file and look more closely
Meanwhile, I also needed to do electric work — to connect the irrigation controller to the valve box. I went a little wrong here, but I’ll tell you what I wish I had done. I wish I had located a sprinkler wire that had 5 wires bound together by a larger casing. Like this:
It’s typically sold by the foot or yard in hardware stores. Each valve needs two wires — one connects to one of the colored wires, and the other connects to the ground (white). So there are 4 lines in total connecting to this white strand, and each of the other colors goes to a single valve. Then connect the other end to the sprinkler controller. There should be a spot for the white wire, and each color should go to a different zone — for example, yellow goes to #1, green goes to #2, blue to #3 and red to #4. Make sure the power is off when you do this, and make sure everything is connected securely. I’m not an electrician, so you might want to consult with one before doing this!
In my case, the sprinkler controller isn’t waterproof, so I have it on the porch in a plastic box, with the wires coming out of it. It is plugged into a normal outlet.
Once it’s all connected, and the spigot is on… the controller can open and close the valves and water (or not water) the plants. I have an interface on my cell phone that allows me to control the valves manually, too, and that’s how I set up all of the different options by zone — like telling it it’s a vegetable garden, with plants that still need to be established. I have the controller checking the output of a personal weather station, too, so that it can tell what the weather is like right here at my house, and adjust accordingly. Additionally, I can set it up so it only waters when I’m allowed to in my area (due to watering restrictions).
I think this pretty much sums it up but feel free to ask questions if you have any and I’ll follow up if there’s anything else that comes to mind as I get further into the project. I’ve only had it in place for a few weeks, and the main “glitch” has been human error — that I’ve closed the spigot rather than leaving it on. Oops. I’m sure there’s much more to learn, as there always is in the world of gardening.
(Disclosure: I will earn a fee if you click-through and purchase some of the products I link to here, but I only mention products in an editorial fashion — not for compensation.)
The post How I made my drip irrigation system “smart” and automatic appeared first on The River.


